Passion Fruit Caramel Bonbons
A soft, flowing passion fruit caramel in a thin dark chocolate shell, cast in polycarbonate moulds. Half the batch goes chilli — passion fruit and hot sauce both hit bright and fast, and the caramel and chocolate carry the length behind them.
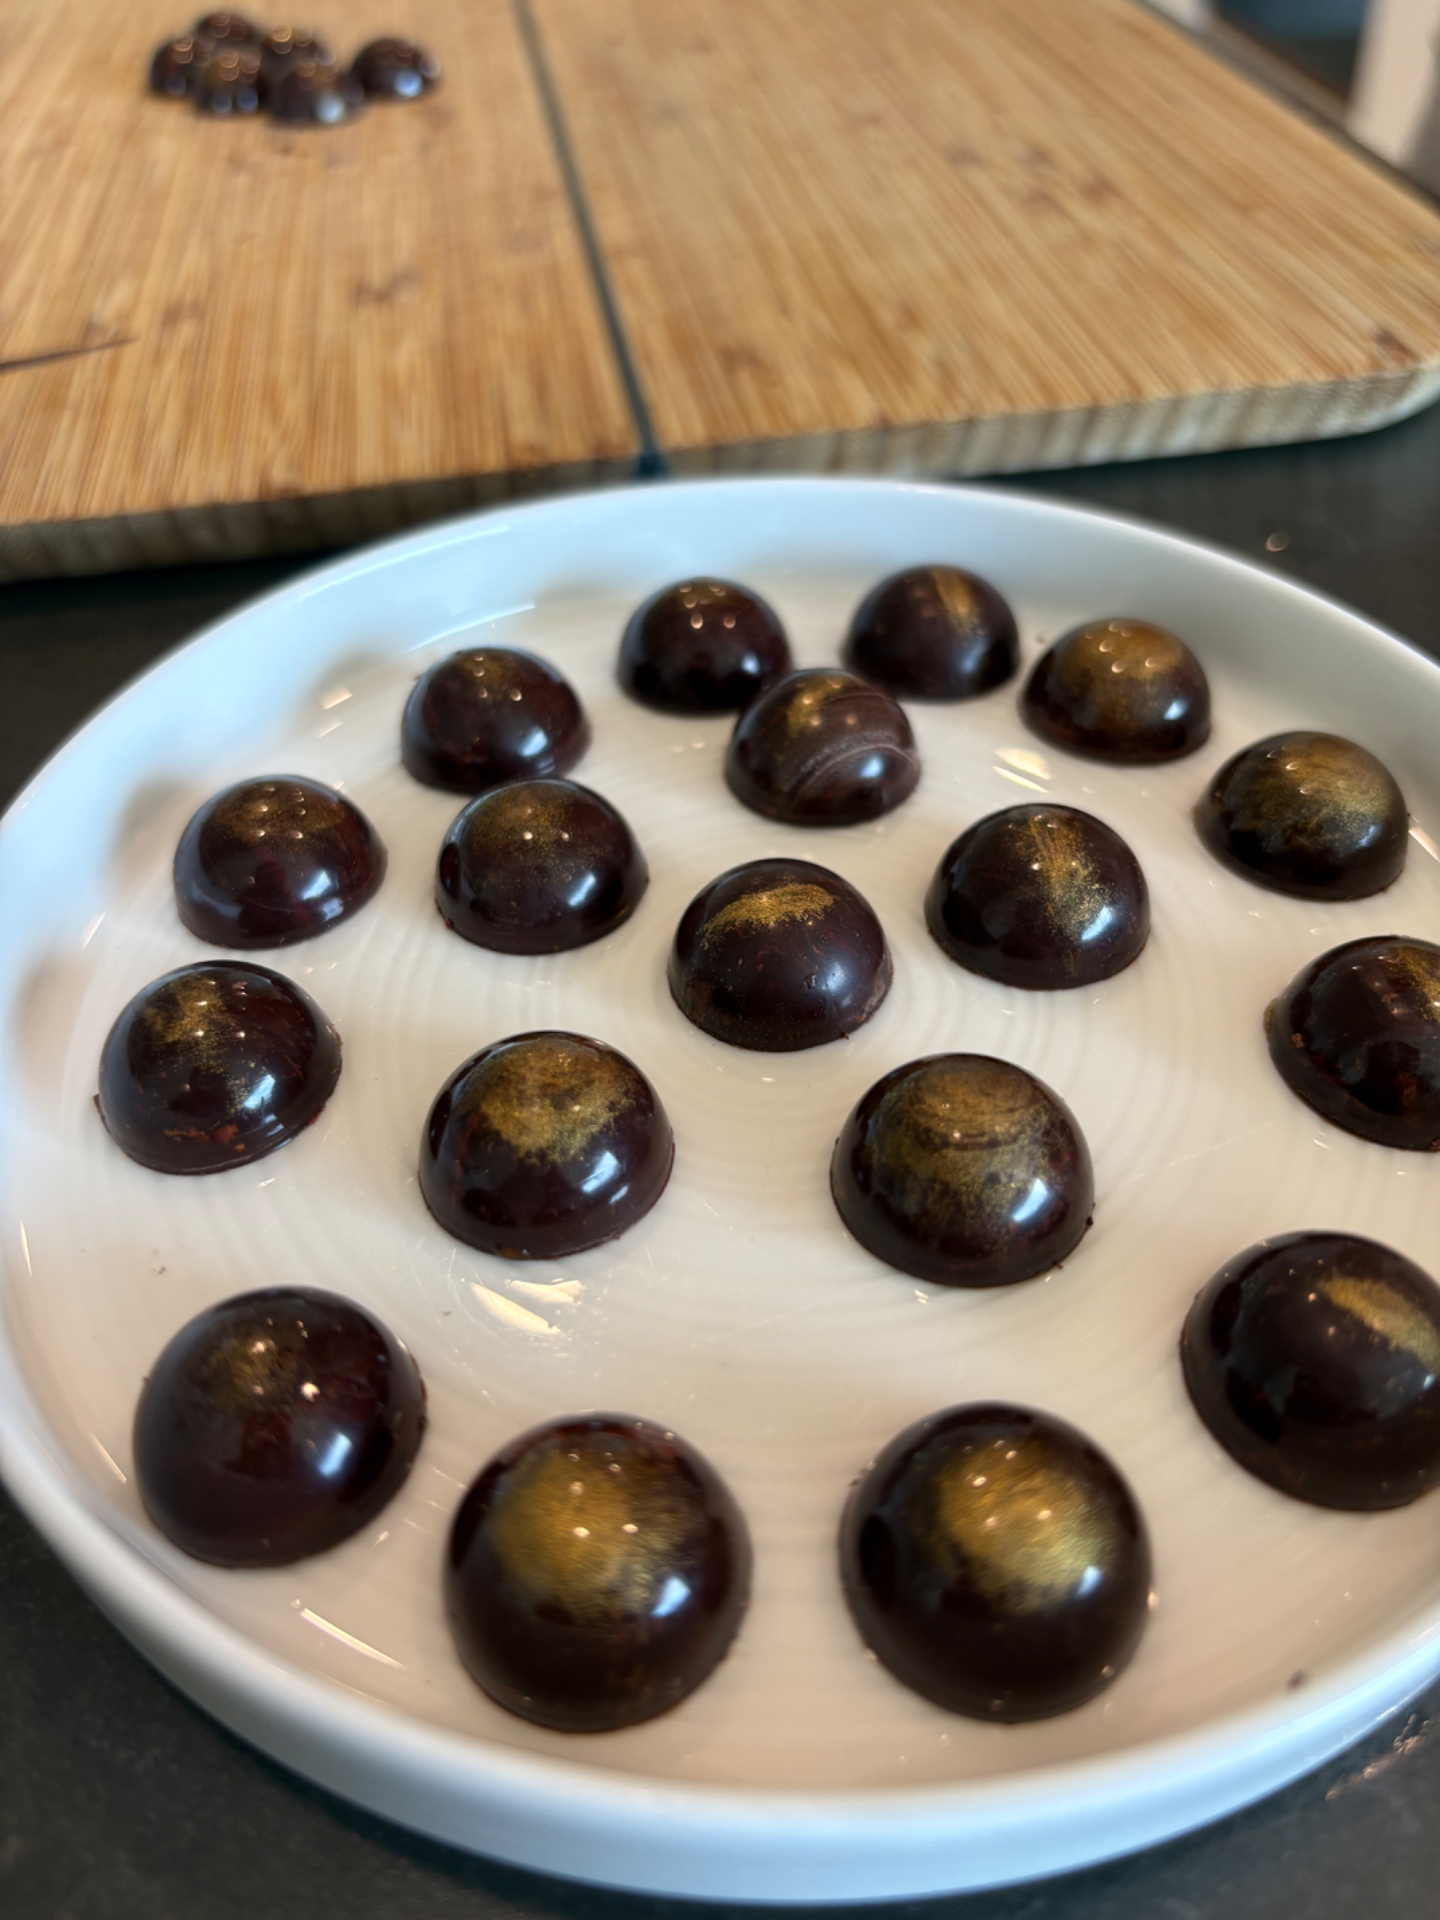
Straight out of the moulds — bronze lustre brushed into the cavities before casting.
Before you start
Three things decide whether this works, and none of them are the ingredients.
- Colour for the caramel, thermometer for the cook-out. The sugar is judged by eye; the syrup is judged by probe. Don't swap them.
- Any adjusting of the caramel happens before the butter goes in. That's the one irreversible moment in the whole recipe — once the caramel is emulsified, re-boiling splits it.
- Undershoot the temperature deliberately. You can always take a syrup further. You can never take it back.
Ingredients
Caramel filling — makes ~300 g
- 10 fresh passion fruit → 100 g strained juice (8 will probably do it; buy 10 so you're not short)
- 140 g caster sugar
- 40 g glucose syrup
- 60 g double cream
- 45 g unsalted butter, cold, cut into 5–6 cubes
- 1.5 g fine sea salt
For the chilli half (optional)
- 8 g hot sauce — about 1½ tsp. Read the warning in step 4 before you increase this.
- A pinch more salt
Shells
- 500 g dark chocolate, 70–75%, finely chopped or callets
Equipment
- Two 24-cavity polycarbonate moulds
- A tall heavy-based pan — the deglaze erupts
- Digital probe thermometer
- Balloon whisk, bench scraper, piping bag, cotton wool, a plate in the freezer
1The passion fruit juice
Straining fresh fruit yourself is an upgrade on shop-bought purée, not a substitute for it — same fruit, same sugar, same acidity, but unpasteurised and with all the aroma intact.
- Halve the fruit and scoop the pulp into a sieve set over a bowl. Press it through.
- Go back for the pulp. The gel sacs cling to the seeds and a first pass leaves roughly a third of your yield behind. Warm the leftover pulp for 30 seconds in a small pan — just to body temperature. This loosens the gel around the seeds and the difference in yield is dramatic.
- Press it through again with the back of a ladle. Work it properly; don't let it drip.
- A tablespoon of warm water through anything stubborn, then press once more. It boils off later.
- Strain the lot once more through the finest sieve you own. A flowing centre shows up grit that a firm ganache would hide.
Weigh out 100 g. Set 15 g of it aside in a separate bowl — that goes back in raw at the end.
This is the opposite of the advice for cartoned juice. Shop-bought passion fruit juice — especially anything labelled "nectar" or "juice drink" — is diluted and sweetened, and does want reducing plus a squeeze of lime. Freshly strained fruit needs neither. Check which one you have before you decide.
2The caramel
- Warm the liquids. Heat the 85 g of passion fruit juice and the cream together to ~80 °C. Hold them there.
- Dry caramel. Glucose into the tall pan first, sugar on top. Melt to a medium-deep amber — judge by colour, not the thermometer. Don't stir once it starts colouring; swirl the pan. If the sugar wants to lump, add it in three batches, letting each melt before the next.
~180 °C is the usual quoted figure, but a shallow layer of molten sugar gives an unreliable probe reading, and glucose browns earlier than sucrose. Colour is the honest guide. Save the thermometer for the cook-out.
- Deglaze. Off the heat, add the hot juice and cream in three additions. It erupts violently — hence the tall pan, and hence never adding it cold.
- Cook out to 114 °C (see below). Pull the pan ~2 °C short — a heavy pan carries over.
Where 114 °C comes from
| Adjustment | Why |
|---|---|
| 110 °C | Baseline for a flowing centre, stored at 16–18 °C |
| +2 °C | For the 15 g of raw juice going back in at the end. That's water added after the boil, so it has to be paid for during it — it pushes the target up, not down. |
| +1 °C | Room at 23 °C rather than 17 °C. A warmer room means a looser set at any given cook temperature. |
| +1 °C | Insurance for the water in the hot sauce, so both halves come off one pan. |
| 114 °C | Target. Cooked and confirmed — see below. |
At 112–116 °C you're at soft ball, ~85% sugar concentration — a caramel that holds its shape and oozes when bitten, not a sauce. Chewy cut caramels go to 118–121 °C; you don't want that inside a shell.
The cold-plate test — the check, if your thermometer is a stranger
You only need this if you don't yet trust your thermometer. A probe reading two degrees high will take you to a genuine 116 °C while telling you 114, and you won't find out until the bonbons are sealed. The first time you make this, or with a new thermometer: cook to 111 °C, pull the pan, and climb in 1 °C steps. Spoon a little onto a plate straight from the freezer, then leave it 3–4 minutes to come to actual room temperature before you read it. Tilt the plate to 45°.
| What it does | What it means |
|---|---|
| Runs like syrup | One more degree |
| Slumps to a low dome and creeps slowly | Stop. That's the one. |
| Holds a crisp edge | Gone too far for a flowing centre |
3Emulsify — by hand, no stick blender
A stick blender is insurance, not a requirement. Caramel predates it. The trick is to change the order and be strict about temperature.
- Let the pan fall to ~50 °C off the heat.
- Reserved 15 g of raw juice and the salt go in first, whisked through. Water phase first — it gives the butter more continuous phase to emulsify into. The raw juice never sees a boil, so the fresh top note survives.
- Butter in 5–6 pieces, one at a time, whisking hard until each has completely disappeared before the next goes in. Same physics as mounting a butter sauce.
Fat check: ~67 g total fat in ~300 g of caramel = 22%, which sits in the professional 20–25% band for a soft caramel. The ratios are sound. Don't fiddle with them.
4The chilli half
Emulsify all 300 g as one batch, then split it. Better volume to whisk, one job instead of two. 300 g divides into 150 g per 24-cavity mould exactly.
Stir 8 g of hot sauce and a pinch more salt into one half. The extra salt matters — the vinegar stacks on top of the passion fruit's own acidity and can tip it sour-sharp.
8 g is the cap. That's roughly the same dilution as the reserved raw juice, which the recipe has already paid for with that extra degree.
If 8 g isn't enough heat, concentrate rather than add. Reduce 20 g of hot sauce down to 8 g in a small pan (about 2 minutes) — same heat, half the water. Or reach for cayenne, which brings heat with zero water and costs nothing structurally.
Plate-test the chilli half separately. If it runs rather than creeps, don't cast it — jar it as a sauce and put passion fruit in both moulds.
5Tempering in the microwave
An inverter microwave delivers true continuous low power rather than pulsing full power on and off, so use 30%, not the 50% that conventional-microwave recipes assume. Use a plastic bowl, not glass or ceramic — they hold heat and keep cooking the chocolate after you stop.
This is the full melt and seed route. It works regardless of what state the chocolate started in — worth using any time there's doubt, and there usually is with a bar that's been sitting in a warm kitchen.
- Melt 390 g to 45–50 °C. 30% power, short bursts, stirring between each. This is the step that erases everything — including any bloom. Don't stop short; a partial melt leaves exactly the crystals you're trying to destroy.
- Let it fall to 34–35 °C, stirring. A few minutes on the counter is enough.
- Add 110 g of fresh, finely chopped chocolate — in two goes. The first crashes the temperature; the second does the actual seeding. That's the whole 500 g accounted for: 390 melted, 110 as seed.
- Stir constantly down to 31–32 °C.
- Any seed left undissolved at 31–32 °C? Fish it out. Do not warm the bowl to melt it away — that's how you destroy the temper you've just built.
Working numbers
| Chocolate | Working temp | Ceiling |
|---|---|---|
| Dark 64–75% | 31–32 °C | 33 °C |
| Milk | 29–30 °C | 32 °C |
| White | 28–29 °C | 31 °C |
6Casting the shells
- Polish the moulds with cotton wool, circular motions, until they're optically clear. The gloss on a finished bonbon is a mirror of the mould surface — it isn't made by the chocolate. This step is the entire difference between shiny and dull.
- Mould at room temperature — 23 °C is fine, never cold. Optionally warm it to 26–28 °C with a hairdryer at arm's length for better flow and gloss. Don't exceed 28. Worth doing at 75% — the higher the cocoa percentage, the thicker the chocolate runs.
- Flood the cavities to the brim and over.
- Tap hard for 20–30 seconds — bench raps plus scraper-handle strikes on the sides of the mould. Trapped air is a hole in the shell, and a hole in the shell is exactly where a flowing caramel breaches.
- Wait about 60 seconds. This dwell is what sets the shell thickness — roughly 2 mm at 31–32 °C.
- Invert over the bowl and drain, tapping the side with the scraper handle until it's down to a drip.
- Scrape, rest inverted 5 minutes, scrape again properly. Rest it on two bars or the lip of a tray, not flat on parchment, so the face isn't sitting in its own drips.
- Set 20–30 min at 23 °C — face-up — then 10–15 min in the fridge, also face-up.
Aim thin and even, ~2 mm. 3 mm gives you a bonbon that's mostly shell; thin spots are where a flowing filling breaks out. If a shell comes out too thin, cast a second coat over the set first one.
7Fill, crust and cap
- Cool the caramel to 28–30 °C and pipe it into the set shells, leaving a real 2 mm of headspace.
- Crust it overnight at 16–23 °C. The skin forms by surface drying, and humidity slows that right down — two hours won't do it in a humid kitchen.
- Bring the mould back to room temperature before capping if it's been anywhere cold, and wipe the mould face and shell rims clean. Any smear of filling on a rim is a spot where the cap physically cannot bond — that's your leak point.
- Warm the mould face briefly — hairdryer at arm's length, a few seconds, keep it moving. You want the shell rims to just gloss over, not melt. This is what welds the cap to the shell instead of leaving it sitting on top as a separate disc.
- Pour freshly tempered chocolate generously across the whole mould, not cavity by cavity. Spread at a low angle first to push it into every cavity and drive the air out of the seam.
- Tap the sides gently. Gently — hard tapping moves a soft filling.
- Scrape flush: one firm pass at ~45°, then a second pass perpendicular to the first. Clean the blade between passes — a loaded scraper deposits instead of removing.
- Wait 2–3 minutes until the cap dulls, then scrape once more. This is the pass that gives a flat, professional base. It takes off the ridges the first pass left and removes anything that crept back over the mould face while the chocolate was still mobile.
- Set 20–30 min at 23 °C, then 10–15 min in the fridge. Invert and the bonbons should drop out. If they don't, back in the fridge for five more minutes.
Notes & storage
- Never deglaze with cold liquid. Sugar at 180 °C meeting cold cream is both dangerous and seizes the caramel into a lump.
- Salt is not optional. 1.5 g is 0.5% of the finished weight — it lifts the fruit and stops the caramel reading flat-sweet.
- Fruit caramel is easier than plain caramel. Passion fruit's acidity inverts the sucrose as it cooks, so this stays soft and won't crystallise or grain. The glucose is doing the same job as insurance — 22% of total sugar, enough to stop graining outright.
- The caramel rewarms happily. Make it a day ahead and bring it back to 28–30 °C if you want to split the work — unlike a pectin gel, which sets irreversibly.
- Don't take the sugar past a medium-deep amber if you want it fruit-forward. A darker caramel is assertive; stopping a shade earlier leaves more room for the passion fruit, at the cost of some of the roast bitterness that bridges to the dark chocolate.
- Storage: 16–18 °C, away from humidity. A flowing centre keeps 1–2 weeks, not the 3–4 of a firm one — softer filling, higher water activity, more chance of a breach. Do not refrigerate — condensation on the shell causes sugar bloom.